Getting Started
Libertas Studio is a comprehensive IDE that comes with every Libertas Hub for free.
Prerequisites
- The user must be an administrator of the Libertas Hub
- The user must be able to manage the Libertas Hub from Smartphone
- The user must use a computer with a web browser, keyboard, and mouse
Start Libertas Studio
Users can only log on to Libertas Hub from the local network for security reasons.
Follow the steps in Accessing Libertas Studio IDE to log on to Libertas Studio IDE.
Libertas Studio IDE is simple and intuitive.

Navigation Panel
The Navigation Panel is located on the left side. It is a simple tree menu.
Development-related features are under “Thing-App.” There are four sub-menus, “Accounts,” “Installed,” “Tasks,” and “Develop.”
Accounts
Every developer must create an account on Hub (and Libertas Network if one wants to publish their work). For more information, please read the chapter Developer Account](../developer_account).
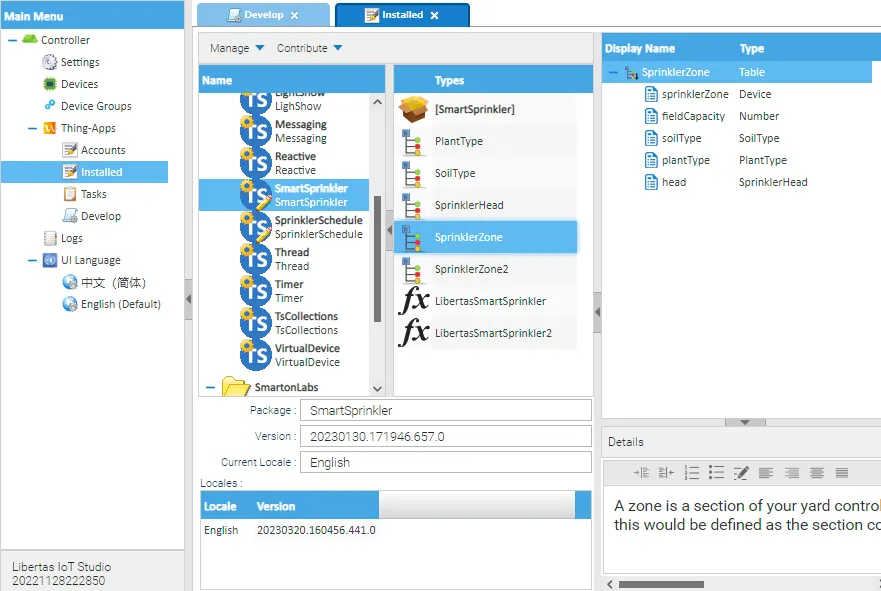
Installed
The Installed browser helps the user explore all Thing-Apps installed on the Hub.
Each Thing-App is also called a “package.” A Thing-App (package) is a collection of Thing-App functions.
An end-user can use a Thing-App function to create a “Task.”
The Installed UI enables the user to navigate through every Thing-App and its functions and view the details of each function, including input structure (signatures) and localized Thing-App UI translations.
Installed ThingApp Management
A user can manage the installed ThingApps:
- Add - Adding a Thing-App from Libertas Thing-App Store
- Disable - Disable all tasks based on this Thing-App
- Remove - Remove the Thing-App (including all versions) and all associated tasks
- History - View historical versions of the Thing-App (version control)
Users can also make contributions to a Thing-App:
- Edit - Edit the Thing-App localized UI strings (improve)
- Translate - Translate the localized UI strings to a different language
Icons
The Thing-Apps are displayed with icons indicating the current status of the Thing-App.
 - New Thing-App, checked out for editing
 - Currently running in production mode, source code checked out for editing
 - Currently disabled by user
 - Currently disabled by the user, source code checked out for editing
 - Currently disabled because of an error
 - Currently disabled because of an error; source code checked out for editing
Tasks
The “Tasks” panel lists all Thing-App tasks. Users can view the status and user data of each task.
Develop
A screenshot of the Development UI is shown below.
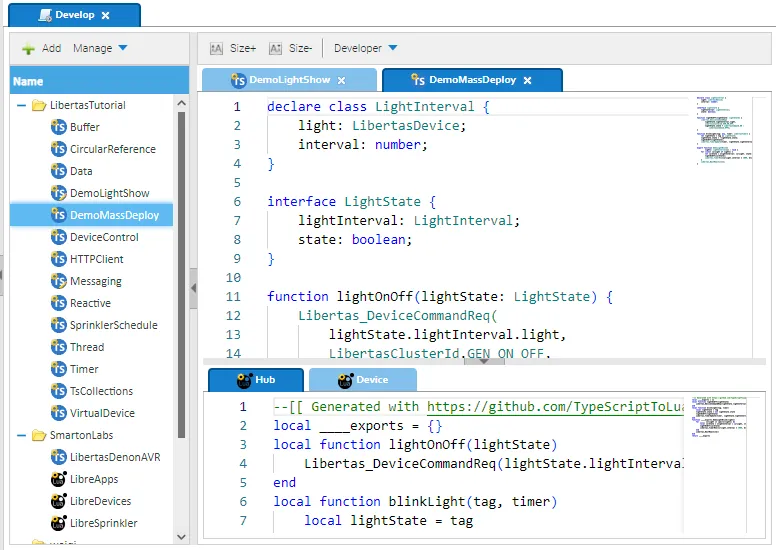
The Left Panel (Thing-App Explorer)
The left panel lists all Thing-Apps installed on the Libertas Hub. Double-clicking the Thing-App will open the source code editor to view the code.
Clicking the “Add” button on the top toolbar will prompt a UI for the user to create a new Thing-App.
The “Manage” menu has options below:
- Disable - Disable all tasks based on this Thing-App (all versions)
- Remove - Remove the Thing-App from Libertas Hub (and all tasks based on it)
- History - View all historical versions of this Thing-App (and view the source code of any version)
- Clone - Clone the Thing-App, with all translations, to a different name (the developer name can be different, too)
The Right Panel (Source Code Editor)
The right panel hosts source editors. Users can switch codes in tabs.

The “Developer” menu has the following options:
- New - Create a new Thing-App
- Checkout & Edit - If the Thing-App is not in development mode, check out the code to edit
- Save - Force saving the code. Note the code is automatically saved to Hub. So, usually, there is no need to save manually
- Commit Snapshot - Save a snapshot version of the code to the version control
- Discard Changes - Discard the current checked-out version
- Deploy - Deploy the Thing-App code to Hub for a test run
- Publish - Publish the code to Libertas Thing-App Store